January is the birthday month in my family. My birthday happens to fall on the 11th, and my cousin's on the 12th. Then exactly a week from our birthdays, my other cousin and aunt get to have theirs on the 18th and 19th. Needless to say, January is full of family, fun and lots and lots of CAKE.
Brady's birthday is also in January on the 28th, and I wanted to make sure I did something special for him this year. Last year, he turned 25 and I created a Mission: Impossible themed hunt for him to find his presents, including some pretty awesome spy videos and a bomb made from his favorite - Red Bull. Maybe I'll bring that back as a Valentine's reprise for him this year and share it with you. It's a real man-pleaser.
For his birthday this year, I ended up getting him a large canvas picture from our trip to Bryce Canyon last year to put in his room and a gift card to REI. He's been oogling a down jacket from there for a while and can't bring himself to spend on it, so I've been giving him small gift cards there for a while in the hopes that he'll use them for the coat. (Update on that, he did and he looks good!)
Even though I had put some obvious thought into both of those gifts, I still didn't feel like the gift felt like something I would normally give. I am all about crafting things and putting together original gifts for someone that can't be bought from just any store. I think it gives them a special touch and lets the other person know that you care about them. (That being said, I have given away plenty of last minute Wal-Mart specials, complete with the signature shopping bag wrapping paper, so no one's perfect.)
I decided to make him a birthday cake, but not just any birthday cake. See, my mountain man is just that - a mountain man. He is perfectly content to have hobbies that include words like "extreme" as part of their title. He loves rock climbing, avalanche hiking, mountain biking and pretty much anything else outdoors. I jumped on Pinterest to get some ideas of what kind of cake I'd want to make for him.
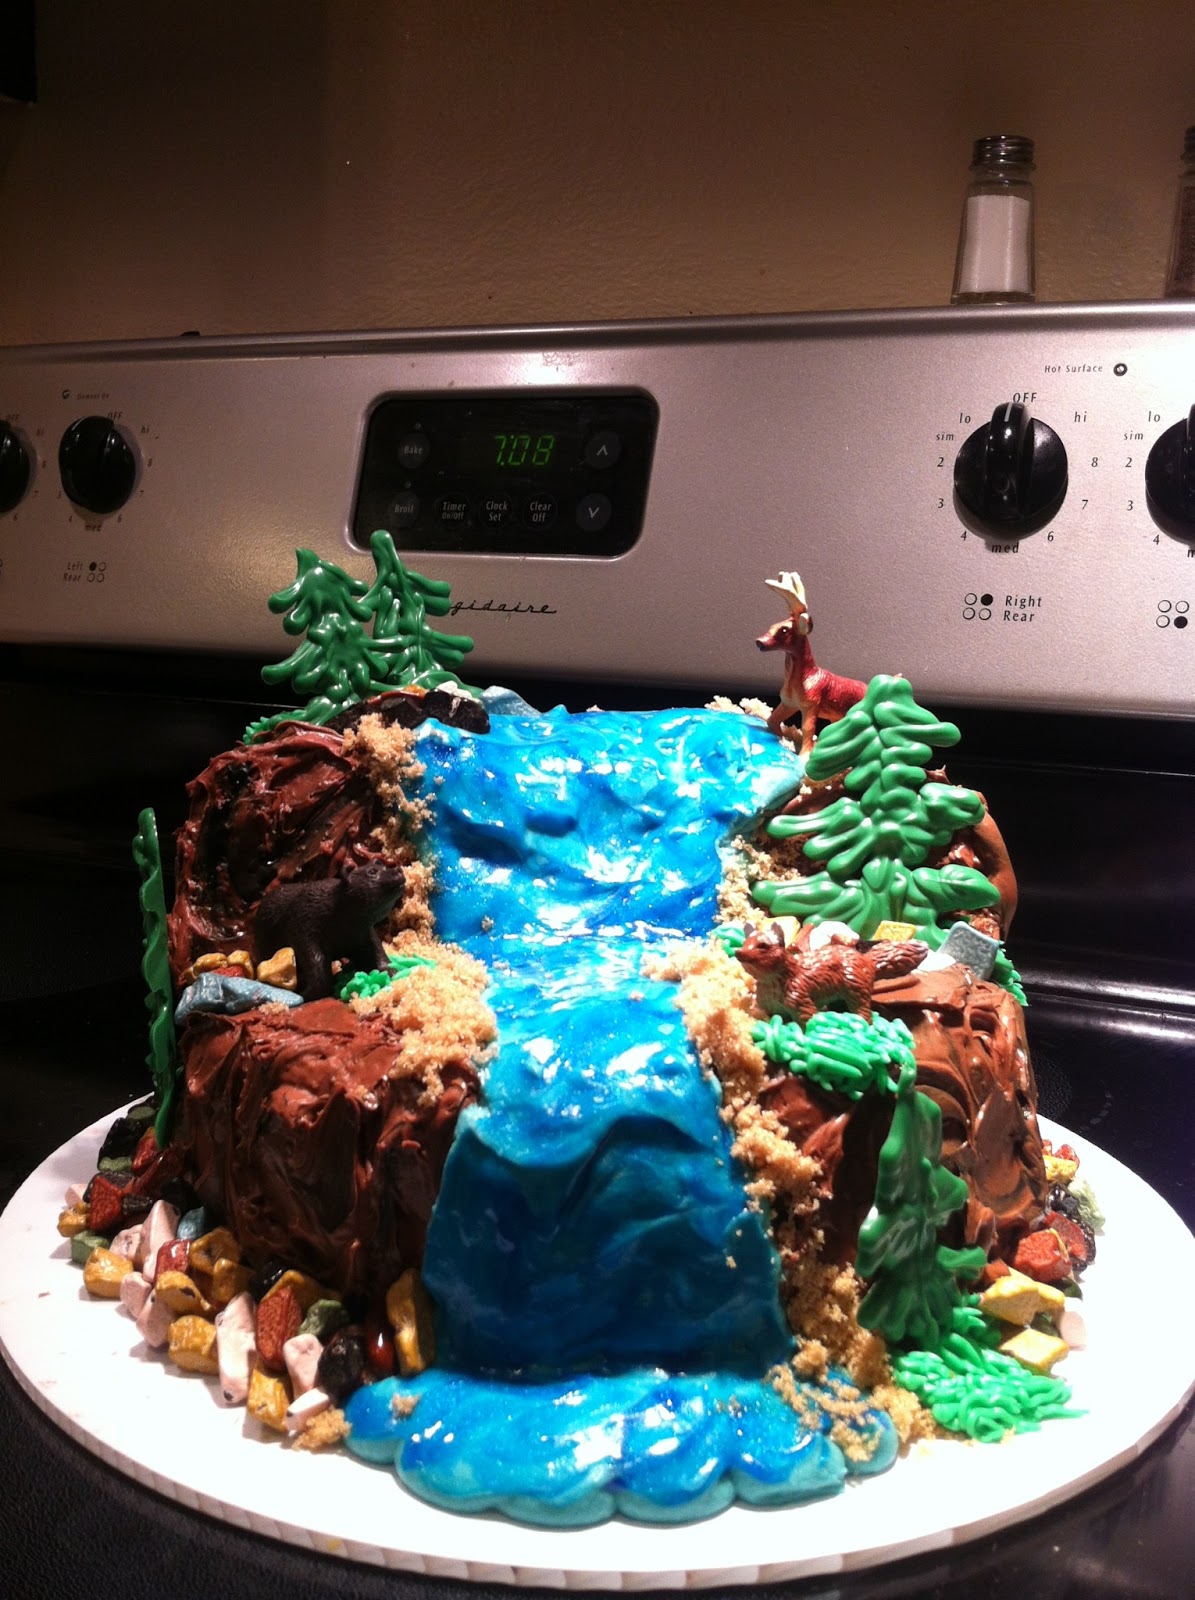
It started out as a rock climbing cake, but quickly evolved into something different. I pulled bits and pieces from each of these cakes and ended up with my own generic adventure cake, which is why I am naming it the Build Your Own Adventure Cake.
For the cake, I doctored up a box cake mix and made three round layers. If you have round cake pans, your job is easy. Or if you are like me and have misplaced your round pans in the chaos of moving, just make a 9x13 and an 8x8 and fudge the assembly. (We're cool like that. )
When your cakes have baked, let them cool completely. If you don't, you'll end up with a mess that's hard to frost and crumbles during assembly. No fun. Take your round cakes (or makeshift round cakes from square and rectangle cakes) and stack two on top of each other for a two-layer cake. Be sure to put a nice filling between the layers. I was lazy and just used the same chocolate buttercream as the regular cake, but added some chocolate chips to the mix.
Next, take the remaining third round cake and cut it in half. Stack this half cake on the normal cake and be sure to put icing between the layers. This creates a nice platform for your waterfall.
Now for the fun part - the icing. I did a base layer of chocolate buttercream on the entire cake and then went back and added more for a more realistic "mountain" look (keeping in mind this is frosting, not actual mountain materials.) To add more color to the cake, I used some black icing I had on hand to swirl into the brown frosting. I just put it on the spatula I was using to swirl it around rather than mix it in with the buttercream. It stayed more defined and I liked the way it looked much better.
For the waterfall, I made a regular vanilla buttercream and split it into two bowls. I colored one a light blue and the other a grassy green. I took the blue and piped it onto the cake in what I hoped would resemble a waterfall, and it wasn't too shabby. For it's glittery sheen, I used some skills I picked up from Buddy on Cake Boss - piping gel. Hobby Lobby sells the glitter kind (Love!) and I put some on the back of a spoon and swirled it over the blue buttercream to get a realistic water-y look.
In the end, it kind of looks like a tube of Crest toothpaste, but whatever. It's cool toothpaste.
For the dirt next to the water, I just used brown sugar - plain and simple. Then it came time for my favorite part - decorating the cake. The trees are made from green candy melts. I just melted the chocolate according to the package and piped the trees onto some parchment paper. This part took a little practice but I ended up with a few trees to pick from so it worked out well. The rocks are actually chocolate rocks I purchased from Harmons, and they were my favorite part. I think it really added to the realistic look of the cake.
Finally, I bought a little toy set of cowboys and indians from Hobby Lobby just to get the bear, fox, and deer for the cake. Now I have a bunch of little toys that I'm not sure what to do with, but I just really needed those animals. I used the green frosting from earlier to pipe some grass where the animals stood and then on parts of the cake for good decorative measure.
All in all, I am in love with this cake! And when I drove it over to the boyfriends for the big reveal, he couldn't believe I had made it myself. So surprised, in fact, that he scooped me up and planted a big kiss on my face. Happy Birthday to me!
The best part about this cake is that it could be pretty versatile. I could have had a little rock climber scaling the back of the cake, or someone fishing in the river if they were big into fishing. It's really a Build Your Own Adventure Cake, depending on what your guy is into!
And the very best part? Not only is it adorably impressive, but it's incredibly delicious as well.


